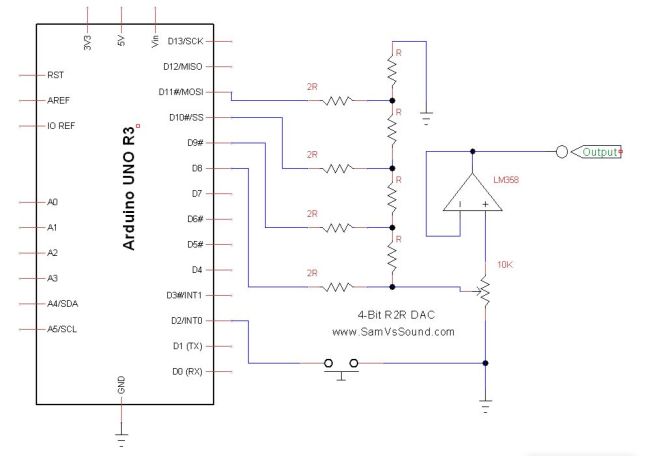
I’ve spent my last few posts tuning my R2R DAC and cleaning up the code. With the changes I’ve made I’ve got things running pretty smoothly. Now I’m ready to start building up the functionality of this circuit to see what I can get it to do.
All The Waveforms
First up I’d like to set up some waveform tables so that I can start switching between states as necessary. In order to do this I will have to set up a button interrupt to select waves, create the state tables and develop logic to select between them. This process will mirror fairly closely what was done in my PWM based oscillator so it may seem somewhat familiar. There are some important differences however due to the limited resolution of the DAC and the use of timer interrupts. I’ll get into these differences in more detail later in this post.
Declarations
#define SWITCH_PIN 2         //Push button to switch waveform
#define N 50                 //Samples per cycle

volatile int switch_state = HIGH;

int table_index = 0;
int curr_table = 1;
int v_level;

//Lookup tables for waveforms
int sine_table[N];
int rsaw_table[N];
int lsaw_table[N];
int triangle_table[N];

//Function definitions to generate wave tables
void get_sine_table();
void get_rsaw_table();
void get_lsaw_table();
void get_triangle_table();
Lots going on there! Lets go through it step by step.
Definitions:
First in the definitions I define my switch pin and table size (N). These definitions are not strictly necessary but make the code a lot easier to read and allow quick modifications when necessary.
Switch State:
Next up we’ve got the switch_state variable. This is part of the implementation of the push button. Note the keyword volatile which lets the Arduino know this variable can change at any time (even without the program changing it). This will allow the variable to pick up changes to the push button during runtime.
Tracking Variables:
Next up we’ve got some tracking variables. Since I’m using timer interrupts rather than a loop with delays I need to track where in the wave I am. That is the function of table_index. Each time I write a voltage to the DAC table_index will be incremented to move to the next value in the table. Curr_table is similar except that it will track which table is being used currently. Finally v_level is used as a place holder which will receive values from the tables to be written to the PORTB register.
Tables:
Last but certainly not least we initialize the tables and functions to generate them. Note each table is of size N. This means if I change my N value the table size will automatically be updated.
Setup
void setup() {
  DDRB = B1111;      //Set Pins 8-11 as Inputs

  timer1_init();    //Initiate timer

  //initiate button interrupt to change waveform
  pinMode(SWITCH_PIN, INPUT_PULLUP);
  attachInterrupt(digitalPinToInterrupt(SWITCH_PIN), switch_pin_ISR, FALLING);

  //Initialize wave tables
  get_sine_table();
  get_rsaw_table();
  get_lsaw_table();
  get_triangle_table();
}
The setup function has a couple new additions since my last post. First I needed to setup and attach the button interrupt which will let me change waves. This is done by first setting the pinMode of the previously defined SWITCH_PIN. Once set up we attach an interrupt to this pin using the attachInterrupt() Arduino function. If you remember from my PWM build this function takes three arguments. First we call digitalPinToInterrupt(SWITCH_PIN) to show what pin is being attached. Then we give the name of the function to be called and finally that the interrupt should trigger on the falling edge of a button press.
Additionally I’ll be calling my four get table functions (which I’ll be setting up soon). These functions populate the tables with values and get them ready to be indexed as the oscillator oscillates.
Switch Interrupt and Tables
void switch_pin_ISR(){
  curr_table = (curr_table + 1)%4;
  }

void get_sine_table(){
  for (int i = 0; i < N; i++){
    sine_table[i] = int(7.5+7.5*sin(i*(2*3.14)/N));
  }
}

void get_rsaw_table(){
  for (int i = 0; i < N; i++){
    rsaw_table[i] = int(i*(15.0/N));
  }
}

void get_lsaw_table(){
  for (int i = 0; i < N; i++){
    lsaw_table[i] = int(15 - i*(15.0/N));
  }
}

void get_triangle_table(){
  for (int i = 0; i < N; i++){
    if (i<(N/2)){
      triangle_table[i] = int(i*(15.0/(N/2)));
      }
    else{
      triangle_table[i] = int(15 - (i-N/2)*(15.0/(N/2)));
      }
  }
}
There are five new user defined functions needed for this program. The switch_pin_ISR function is identical to the one I used in my PWM project. It increments the curr_table variable and uses the modulo opperator to ensure the value is always between 0 and 3.
The table definitions are slightly different. Where with my PWM project I had a range from 0-255 to define my voltage levels I now only have 0-15 (for the 16 states of the 4bit DAC). You may notice as well I’ve added some strange typecasting to these functions. The issue I ran into was that for any N greater than 15 the result of 15/N returned 0. To get around this I used 15.0/N which gave a float result. Once I had finished the calculations I type casted this float back to an int so I could write it to the PORT register.
Timer Interrupt
ISR(TIMER1_COMPA_vect){
  switch(curr_table){
    case 0:
      v_level = sine_table[table_index];
      break;

    case 1:
      v_level = rsaw_table[table_index];
      break;

    case 2:
      v_level = lsaw_table[table_index];
      break;

    case 3:
      v_level = triangle_table[table_index];
      break;
    }
  PORTB = v_level;
  table_index = (table_index + 1)%(N);
}
Finally I modified the timer interrupt function. By adding a switch statement I allow the v_level variable to be set based on the value of curr_table. Once this v_level is set I write it to PORTB to generate the output voltage. Last I increment the table_index variable to move to the next wave step. Again I use the modulo operator to reset table_index back to zero once it reaches N.
That about covers it for today, In my next post I’ll be modifying the code again to add the ability to adjust the frequency. As always I’ll finish by posting the full code. Till next time!
#define PIN_8 8
#define PIN_9 9
#define PIN_10 10
#define PIN_11 11

#define SWITCH_PIN 2         //Push button to switch waveform

#define N 50                 //Samples per cycle

volatile int switch_state = HIGH;

int table_index = 0;
int v_level;

//Lookup tables for waveforms
int sine_table[N];
int rsaw_table[N];
int lsaw_table[N];
int triangle_table[N];

int curr_table = 1;

void timer1_init();

//Function definitions to generate wave tables
void get_sine_table();
void get_rsaw_table();
void get_lsaw_table();
void get_triangle_table();


void setup() {
  DDRB = B1111;      //Set Pins 8-11 as Inputs

  timer1_init();    //Initiate timer

  //initiate button interrupt to change waveform
  pinMode(SWITCH_PIN, INPUT_PULLUP);
  attachInterrupt(digitalPinToInterrupt(SWITCH_PIN), switch_pin_ISR, FALLING);

  //Initialize wave tables
  get_sine_table();
  get_rsaw_table();
  get_lsaw_table();
  get_triangle_table();
}

void loop(){
  }

void timer1_init(){
  noInterrupts();
  TCCR1A = 0;
  TCCR1B = 0;
  TCNT1  = 0;

  OCR1A = 125;                //Compare Value
  TCCR1B |= (1 << WGM12);      // CTC mode
  TCCR1B |= (1<<CS11);    // 8 prescaler
  TIMSK1 |= (1 << OCIE1A);  // enable timer compare interrupt

  interrupts();
}

ISR(TIMER1_COMPA_vect){
  switch(curr_table){
    case 0:
      v_level = sine_table[table_index];
      break;

    case 1:
      v_level = rsaw_table[table_index];
      break;

    case 2:
      v_level = lsaw_table[table_index];
      break;

    case 3:
      v_level = triangle_table[table_index];
      break;
    }
  PORTB = v_level;
  table_index = (table_index + 1)%(N);
}

void switch_pin_ISR(){
  curr_table = (curr_table + 1)%4;
  }

void get_sine_table(){
  for (int i = 0; i < N; i++){
    sine_table[i] = int(7.5+7.5*sin(i*(2*3.14)/N));
  }
}

void get_rsaw_table(){
  for (int i = 0; i < N; i++){
    rsaw_table[i] = int(i*(15.0/N));
  }
}

void get_lsaw_table(){
  for (int i = 0; i < N; i++){
    lsaw_table[i] = int(15 - i*(15.0/N));
  }
}

void get_triangle_table(){
  for (int i = 0; i < N; i++){
    if (i<(N/2)){
      triangle_table[i] = int(i*(15.0/(N/2)));
      }
    else{
      triangle_table[i] = int(15 - (i-N/2)*(15.0/(N/2)));
      }
  }
}

